with Rene’ McCracken
Welcome to my food design column. Here you will find mostly old east Texas recipes with southern ingredients that I grew up with and now grow in the NTCC Farmers Market Garden! I am not a chef but a food engineer - I love to design and re-design food from the ground up!
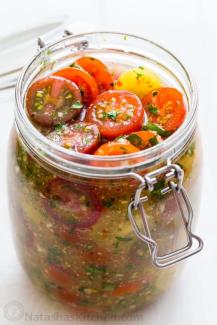
Herbed Heirloom Cherry Tomatoes
Graduation commencement has ended another semester at NTCC and with mixed feelings we graduated some of our favorite students on the farm! With three whole weeks ahead of us, it will be the best we can do to be keepers of the farm until our new Work 4 Scholarship students arrive willing and ready to continue planting and help with the harvest on our sustainable market farm.
The moderate storms and rainfall have proven difficult for gardeners and farmers alike in the Northeast and NTCC has not managed to dodge the bullet on extra rainfall this spring. Some old time tomato favorites like Black Krim and Beefstake are struggling to produce in the weather extremes, however our cherry tomatoes are off and running to a good start for the summer harvest. Of course, I can just eat them right off the vine but when I am looking for a “wow-able” product that we can sell at next Tuesdays Farmer’s Market in Mount Pleasant – I am thinking this week’s Farm Fashioned Recipe: Herbed Heirloom Cherry Tomatoes will draw the attention and sales that I need. Plus if there are leftovers – I definitely know where they are going!
Herbed Heirloom Cherry Tomatoes:
Ingredients
- 4 cups cherry or grape tomatoes, halved if larger than bite sized ( I am using black cherry, Matt’s Wild Cherry, Atomic Grape, yellow pear and Large Cherry varieties)
- ¼ cup red onion minced – greens and all if you have fresh picked
- ¼ cup fresh herbs: basil, chives, oregano, parsley (roughly chopped)
- ¼ cup of balsamic vinegar
- ¼ teaspoon sugar (raw, natural)
- ¼ teaspoon minced garlic
- Salt and pepper to taste
Instructions
Combine vinegar, sugar, garlic, salt and pepper in a small bowl. Next clean, prep and chop you herbs and slice tomatoes and onion then combine in large bowl. Next pour your vinegar and spice mixture and mix thoroughly. Give the mixture a taste and see if it is to your liking. Refrigerate for an hour to let flavors combine and then serve. Optional: Place mixture in jars, add additional white wine vinegar if needed to cover the tomatoes and give as gifts or sale at farmers market like we will be doing. The mixture will be a definite go to in your fridge for up to a couple of weeks. It can be eaten right out of the jars, use as a topping for your favorite pasta, or one of my favorites on top of grilled chicken or as a last addition to roasted vegetables! I am sure that you will find other ways to enjoy this farm fashioned specialty! You can contact Rene’ McCracken at 903-434-8267 for more info.
Grilled Chicken Spaghetti Salad
Spring has “sprung” and we are busily getting our garden cranked up and growing at NTCC Sustainable Market Farm. At our annual plant sale and yard sale at Springfest this Friday and Saturday we will be selling one of my most requested dishes. For you lucky readers I am going to share in this issue of Farm Fashioned Recipes our Grilled Chicken Spaghetti Salad! This is the reason I plant a variety of tomatoes, bell peppers and basil in our garden every year just to get the ingredients to make this wonderful salad. You can also alter this is several ways like adding bacon or fresh sliced zucchini or using spaghetti squash instead of pasta to make a wonderful keto friendly dish. It has more than once been requested by my church family at fellowships and by my students and faculty at summer socials. Next time you are requested to bring the “salad” to a BBQ – serve up this crowd pleaser and enjoy the accolades!

Ingredients:
For the Chicken:
1 pound of grilled chicken breasts sliced or cut into bite sized chunks (see previou recipe on brined grilled chicken)
Can purchase cooked frozen grilled chicken
For the Dressing:
- 2 cloves crushed garlic
- 2 tablespoons fresh basil chopped (or 1 tablespoon dried)
- 2 tablespoons fresh oregano chopped ( or 1 tablespoon dried)
- 1 Tbsp Dijon mustard
- 1 balsamic vinegar
- 1 Tbsp of honey (can also use stevia here)
- 3/4 c light olive oil
- Salt and pepper to taste
For the Pasta:
- 1 pound your favorite pasta
- 1 10 ounce carton cherry tomatoes, halved
- 1 bell pepper diced
- 1/2 cup sliced thin red onion
- 1 cup grated Parmigiano cheese
Instructions:
For the dressing: Mix all dressing ingredients together in a medium bowl. Set aside. Prepare grilled chicken or open and thaw packaged grilled chicken and allow to cool. For the Pasta: In a large pot, cook pasta in salted boiling water until al dente (tender but firm). Drain off water and place pasta in a bowl with ice water. Once the pasta is cold, drain off water (let it sit in the strainer for about 5 minutes to dry well). To a large bowl, add pasta, tomatoes, onion, bell pepper, cheese, and chicken. Drizzle dressing over the top and then toss until combined. Place covered in the refrigerator until ready to serve.
If you would like to taste this recipe before you try it – come out to the NTCC Springfest Friday March 29th or Saturday March 30th. Enjoy the meal, the farm tours, shop the garage sale booths or dare to try our Goat Yoga! For more information on NTCC Ag Program and events contact Rene’ McCracken at 903-434-8267 or rmccracken@ntcc.edu or like us on facebook at NTCC Ag Department.
New Year's Stew
The beginning of year follows some great traditions. It is a time of reflection of the past year, a time of resolutions and perhaps you are a traditional southerner and it also means a meal of black-eyed peas and cabbage. My family was definitely not a strong believer in superstitions but I could say that we did love our traditions. So every year we would make sure that we had some of each on New Year’s day. As a part of farm girl living I never waste a thing. From recycling old newspapers and cardboard for our gardens to re-inventing leftovers to wonderful next day meals. After many years of practice, I have become equally known for creating unique dishes from ordinary leftovers as from my original dishes. This past New Year’s Day we observed the traditional peas, cabbage and cornbread along with pan-fried round steak for our meal. Unfortunately due to illnesses, I did not have the crowd expected and the dreaded left-overs remained. It is with those meager “leavings” that the most delightful stew was created that I will definitely choose to make again – New Year’s or not.
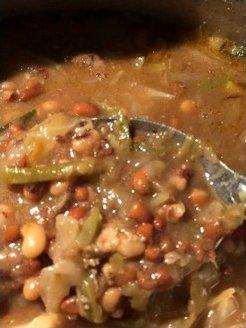
This week’s Farm Fashioned Recipe is New Year’s Stew. It is a combination of black-eye peas, sautéed cabbage, green beans, onions, pan-fried round steak and a can of petite diced tomatoes. The resulting stew is definitely more than the sum of its ingredients! While this was originally created from already cooked entrees – the recipe includes from scratch measurements below.
Ingredients:
- 4 cans of cooked black-eyed peas
- 1 can of green beans
- ½ green cabbage cut in bite size pieces
- 1 yellow onion
- 2 cans of petite diced tomatoes
- 1 lb of cooked round-steak pan fried and cut in bite sized pieces
- Salt, garlic and pepper to taste.
Start by putting peas, green beans and tomatoes in a 8 quart pot on low heat. Next pan fry diced onions and round steak and add to stock pot. Lastly sauté cabbage in olive oil till slightly tender and then add into pot. Add more water to ensure all ingredients are covered and continue on low heat till all ingredients are cooked through. Serve up with cornbread or better yet some jalapeno hushpuppies! This recipe freezes and reheats well and was great on cold nights when the “What’s for dinner” just came too early for me.
Stove Top Meatballs
The fall and winter time of the year have us slowing down on the farm a bit and beginning to celebrate the holidays. Plants are moved indoors and gardens have finally quit producing and its traditionally a good time to process meats on the farm.
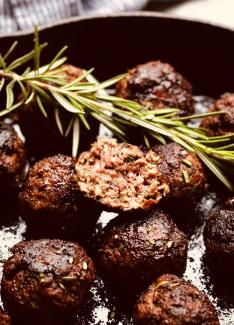
This year we have both farm raised beef and pork and both could be used for this crowd pleasing recipe. The Stove Top Meatballs were a hit at our Christmas party as I’m sure they will be at any gathering you take them to.
Stove Top Meatballs
Ingredients:
- 5 lbs ground beef 90/10 is best
- 1 box Stove Top stuffing herb mix
- 1 can diced stewed tomatoes
- 3 eggs slightly beaten
- 1/3 cup liquid smoke
- 1/4 brown sugar
- 1 tablespoon of salt,
- 1 tablespoon pepper
Mix all ingredient in large bowl till completely mixed evenly. Fashion each meatball into your preferred size (mine are always Texas sized) place on a metal tray and roast in a 375 degree oven for 45 minutes or until juices run clear. Pour off grease as needed to prevent burning and smoking up your kitchen. I like to broil them for 5 minutes to put the perfect amount of char on them which is always the piece worth fighting for! Allow them to cool and then decide on your sauce. Perhaps a beer based BBQ sauce or a nice marinara for the Italian dishes. How about something completely different like sour cream Beef stroganoff sauce would be good as well. I encourage you to double or triple the batch as once frozen this meatball freezes well and can be pulled out and warmed up for last minute meals or when that unexpected guest shows up.
Up-scaled Kindergarten Feast
The Thanksgiving holiday for cooks is anything but a holiday to be putting it mildly. It is filled with all kinds of family favorites and historic dishes that challenge each household to get everything just right for the big reveal on the family table. The pressure of perfection can only be out-weighed it seems by the sheer expense of producing the perfect meal sometimes. Last but not least, there definitely is not a single calorie counted nor serving size observed when we show our “thankfulness” sometimes more than once over the holiday. So after all of the festivities, I am usually a little less inspired to create lavish meals for my family. Of course, that is not their desire or expectation of a mom that “can just through together a five course meal” with just a few things in the pantry and 30 minutes in the kitchen!. This year my after thanksgiving meal was named by my baby girl as “Up-scaled Kindergarten Feast”. Now while this is not generally keeping to my theme of farm fashioned recipes – It definitely works to give all us hard working cooks a break by providing a quick meal that definitely satisfies!
So what pleased my family so well? The simple beans and weenies and macaroni and cheese with just a little more flare. Of course both of these come in a can and that I think is the unexpectedness of the dishes. Never have I truly tried to take a kindergarten meal and make it for big kids before – but the ease and versatility of it may have your family picking a kindergarten dinner night of the week themselves!
Beans n Weenies
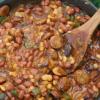
Use your favorite hotdog or even sausage and slice and cook in a skillet until your desired “char” is achieved on the weenies. Next open a can of your favorite style of baked beans and add them into the pan. Last ingredient is up to your families tastes. You can add a thick and hearty picante sauce or your favorite BBQ sauce or even sliced jalapenos to really heat things up a bit. Given the dish a couple of stirs to mix well then put in the oven to finish off at 350 degrees till thickened and bubbly.
Mac n Cheese

Purchase your favorite type of pasta noodle. I used large elbow and loved the way it held all the cheese. Boil the pasta noodles till just right and strain most all the water from the pot. Add in a stick of real butter, salt, pepper, 1 cup of milk or heavy cream and a small package of fresh spinach. Then add in your favorite Velveeta cheese; I chose white queso cheese for our dish. Lastly, my secret to the creamiest dish ever is to add about a ¼ mayo to the mix and stir well till all cheese is melted and blended. Pour mix into a casserole dish and cover with grated cheese and if you have them croutons. Put into your 350 degree oven and cook till cheese is melted.
Curry Honey Stuffed Turkey

If you have survived October fall festivals and events then you are headlong into a thankful harvest in Texas. The college garden was no exception to homeowners garden in having a better fall harvest than we did this past dry spring and summer. Garden clean-up and winter preparations are in full swing in hopes of getting all our tasks completed before the first freeze, typically around November 15th. With all the business of a working mom with active teenage daughters, the last thing I want to worry about it what my Thanksgiving meal is going to be like. With this simple farm fashioned recipe, I am always assured that weather hosting or traveling – my Curry Honey Glazed Stuffed Turkey will be the talk of the meal and absolutely perfect!
The trick to the perfect juicy turkey is definitely in the brine! Brines have been used forever in cooking but were used mostly by our grandmothers trying to tenderize the wild caught meats including turkeys or the family raised one. Coincidentally, turkey manufacturers also use this method to process their birds and it is the added “special ingredient” to keeping those turkeys buttery that you purchase in the stores. This simple brine solution can be utilized for any and all low fat meats that you want to ensure the best texture and flavor remains after the cooking process.
Brining is a salt/sugar water solution that changes the structure of the muscle tissue in the meat and allows it to absorb water, spices and flavorings. This process will work on turkey and other meats but make sure they are natural and no additives added so they are not already injected. Depending on your needs choose from a 10 to 20 pound turkey and if it is frozen – thaw completely before brining. You should trim any excess fat and remove the neck and giblets before brining and save for making the gravy later! Lightly rinse with cold water and dry the outside of turkey with paper towels. Next choose a container that will hold your turkey, the brine solution and fit into your fridge or a large cooler.
Brine Solution:

- ¾ cup course kosher salt
- ¾ cup granulated sugar
- 1 cup boiling water
- 1 tablespoon of course ground black pepper
Optional: (Add for taste preferences)
- Apple juice or cider
- Bay leaves Herbs – Rosemary, Thyme, Basil, Sage, Oregano
- Wine or Beer
- Lemon slices
- Crushed garlic
- Onion slices
- Liquid Smoke
As you can see you can get quite elaborate with your favorite flavorings and no two brines would taste exactly the same. Be especially vigilant to maintain turkey and brine solution at 40 degrees or lower but don’t freeze. Length of time to brine is also important. A whole Turkey should require 1 to 2 days so don’t wait till the last minute and expect to get the best result. The smaller the piece of meat the less time required in the brine, with chicken pieces only requiring 2 hours. After brining the correct amount of time – I remove the turkey from the brine and rinse thoroughly. Discard the brine solution. Now your turkey is ready for cooking. Depending on your preference you can bake, smoke or deep fry your turkey but the brining process will help it cook quicker. For the Curry Honey Stuffed version – I would now stuff the turkey cavity with either homemade stuffing or wild rice/onion and mushrooms and place in a large roasting pan. Next, I combine equal parts butter and honey and add 3 tablespoons of curry powder. Smear this liberally on the turkey – cover with foil and bake in a oven at 300 degrees till internal temperature of meat reaches 175 degrees. During the last 30 minutes of cooking, bake turkey uncovered and apply move of the curry honey butter mixture. Rest turkey for a few minutes before carving and enjoy the oooooossss and ahhhhhhhs you will definitely receive for your hard work!
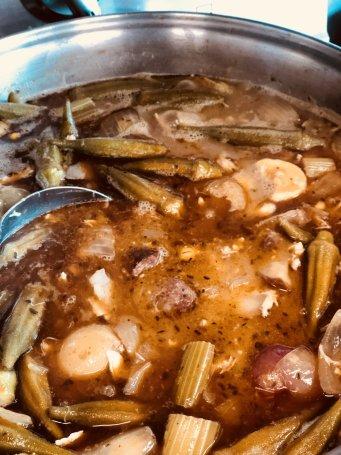
Culture, tradition, family and experiences are the heart and soul of every good cook’s recipe arsenal. In my case, I also add in the agriculture element of growing the ingredients for my Farm Fashioned Recipes. Although we are in east Texas there are several connections and a short drive into Louisiana that have me including a little creole in my list of dishes. A staple among Louisiana cuisine has always been Gumbo and since it is basically a creole flavored stew - the variations of gumbos are endless. Today’s farm fashioned recipe is Chicken Andouille Sausage Gumbo.
My interpretation starts with the planting of traditional vegetables, herbs and raising and processing of our own brand of andouille sausage. Although Gumbo can include seafood - we don’t raise that at NTCC Farm and with most people sensitive to seafood - I leave it out of this variation. Smoky andouille sausage, okra, and aromatic vegetables and herbs make this an authentic recipe perfect for anytime but especially at the end of our gardening season and as the temperatures begin to cool it’s always on the menu for me and my students.
In order to make a classic Gumbo you must understand the process of making a flavorful roux. Roux is a classic French technique used as a thickening agent in soups, stews, and sauces. The roux is a mixture of equal parts fat (animal or vegetable) and flour. There are different types of roux based on color as it cooks; white, blond, brown and dark brown. I used blond for this particular Gumbo. Don’t be timid about adding in your favorite vegetables or maybe some white wine – to make this recipe one of your most requested dishes. Here are the ingredients that worked for me.
Ingredients:
- I whole chicken boiled, with your favorite herbs, cooked, picked and diced removing skin, bones and cartilage reserve the chicken broth to flavor the base of Gumbo.
- 2 quarts water and more for boiling chicken and thinning gumbo as needed
- 1 pound okra , we use whole frozen pods that are only about 2 inches long to prevent “slimy” texture of Gumbo
- 1/2 cup coconut oil flavored with garlic and butter or unsalted butter.
- 1/2 cup all-purpose flour 1cup of heavy cream to thicken roux and add richer texture and flavor.
- 1 1/2 cups yellow onion , large diced
- 1 1/2 cups bell pepper , sweet banana and other mild chilies diced
- 1/3 cup celery , sliced
- 2 lbs of sliced golden potatoes
- 1 can of whole sweet corn (fresh if you have it)
- 2 cloves garlic , minced
- 2 cups of tumbling tom tomato berries added last before serving
- 12 ounces Andouille sausage , cooked, sliced
- 1 bay leaf , dried and added to pot and removed before serving
- 1 teaspoon thyme , diced
- 1 teaspoon basil ,chopped roughly
- 1 teaspoon cayenne pepper , or chili pepper
- 1/2 teaspoon black pepper
- 1 teaspoon kosher salt
- 1 tablespoon gumbo file’
INSTRUCTIONS
- In a 8 quart pot, add chicken whole chicken with salt, pepper, herbs and cover with 2 quarts of water. Bring water to a boil, then simmer until fully cooked. Strain the water and reserve to add into roux. Remove the cooked chicken from the pot, and allow to cool. Once cooled, shred chicken into smaller pieces, remove skin, bones and cartilage and cover and set aside.
- In a roasting pan, add andouille sausage, onion, garlic, celery, potatoes and peppers drizzle and toss with olive oil and salt and pepper and roast in oven or on grill to tender and slightly charred.
- In a large pot, combine ½ cup coconut oil flavored with garlic and butter and ½ cup flour. Cook over medium heat, frequently stirring with a whisk to make a dark brown roux, about 15 minutes. Make sure to stir the last 5 minutes of cooking consistently, so the roux does not burn.
- Add onion, bell peppers, celery, and garlic. Sauté until vegetables are tender, about 8 to 10 minutes.
- Add bay leaf, thyme, basil, cayenne, pepper, and salt.
- Add 4 cups of the reserved strained water from the cooked chicken, mix well. You may add more water depending on how thick you want the gumbo.
- Add roasted vegetables, corn, and frozen whole pod okra. Add additional chicken stock as needed.
- Simmer over medium-low heat, for approximately 30 minutes with the pot loosely covered, stirring occasionally.
- Add cooked shredded chicken and simmer an additional 15 minutes.
- Add 1 cup of heavy cream and 1 tbs of gumbo file to taste.
- Turn off the heat, and slowly stir in the file. At this stage I add in our tiny cherry tomatoes and stir in. Do not reboil after adding in the file as this tends to make the gumbo stringy. Taste gumbo and season with more salt or pepper as desired. Serve over steamed rice.

Our Fall 2018 semester is kicking off this week at Northeast. It’s hard to believe that fall season is just around the corner and the pumpkin spice ‘everything’ will soon start lining the shelves, especially with 100 degree temperatures still with us.
The last of summer has most gardens past their prime. However with the use of shade and heaving mulching we have managed to still be harvesting tomatoes, bell peppers and of course okra. As always when I have extra produce — I try to find unique ways to enjoy the abundance!
Today’s recipe - Fried Okra Salad uses all of summer’s-end bounty in the most delicious way. Southerners have fried okra and just about every other vegetable but maybe not in whole pieces. We select our okra pods to be small, tender and flavorful and bypass the chopping phase. Simply wash then dry and prepare for frying. I used equal parts of self rising flour and yellow cornmeal with added salt, pepper, Cajun seasoning and dill for the dry mix. Next, I whisked together 4 eggs and 1/3 cup of salsa. Now the messy part. Dredge the okra pods in the egg mixture then in the dry mix till evenly coated. Fry in hot oil till crispy brown. Rest on paper towels to absorb excess oil.
While friend okra is resting, slice a vine ripe tomato, a bell pepper, red onion and if you prefer add in bacon chucks. Toss together and serve with your favorite dressing. I prefer a balsamic honey dressing or a Tuscan Italian as pictured. I also like to add in parmesan cheese or feta cheese to the mix as well. Take this to your next potluck and I swear you won’t have to take a single bite home. Farm Fashioned Recipes are recipes grown and developed by Rene’ McCracken at the NTCC Farm in Mount Pleasant Texas. McCracken is the director of agriculture and resident foodie that inspires her students to choose locally grown foods to permeate their meal selections. McCracken can be reached at 903-434-8267 or rmccracken@ntcc.edu.
Nothing Beats a Great Biscuit

There are several types of signature dishes that I can become known for in both my role as Director of the Ag program at NTCC and as wife and mother and even cook at my church. However, whether competing in the annual Taste of Northeast at the college or just providing the bread for a fellowship dinner or family function – nothing beat my biscuits! I came across the idea several years ago while I was an extension agent working in Rusk, TX. Next door to the office was the most convenient and delicious “Iron Horse Café”. There were several weekly dishes that were consistently making me a regular patron there but I have to admit it – diet or not – I could not get enough of their biscuits. Delightfully moist and fluffy and perfect for dunking, smothering or just slapping on some apple butter for a great snack. They were crunchy and flaky and delicious. After several attempts – I finally talked the owner out of her recipe. Simple – she said, “ Just two ingredients, self-rising flour and heavy cream”. Now I have always been a five senses kind of cook; that means that I generally don’t follow a recipe and just kind of use my sight, taste, smell and fell my way to my creations. I have always seen this as a positive, until I have had to teach someone else how to do what I do. Then it becomes a little more difficult.
I developed “my way” of fixing biscuits using my senses but googled and borrowed the exact amounts from Paula Deen. Later, when I came to the college and had rosemary I believed that I found a unique way to improve on a perfect biscuit. Rosemary is a great herb to have in the garden or even the landscape and is found several places throughout our small farm area at NTCC. It gets added to our muscadine jelly and especially my pork and chicken recipes often but I only recently thought of adding it to the biscuits. If you don’t have fresh rosemary then dried will do. A little bit will do – so only add two tablespoons to the following recipe.
Cream Biscuits
Recipe courtesy Paula Deen
Ingredients
- 2 cups self-rising flour, plus more for dusting
- 1 tablespoon sugar
- 2 tablespoons of rosemary diced or crushed if dried
- 1 1/2 cups heavy whipping cream
Directions
Preheat oven to 500 degrees F.
In a medium bowl, stir together the flour, sugar + rosemary mixed together, and cream until the dough forms a ball. Turn the dough out onto a surface dusted with additional flour. Fold the dough in 1/2 and knead 5 to 7 times, adding just enough flour to keep dough from sticking to your hands. Gently roll out dough to 1/2-inch thickness. Using a 3-inch biscuit cutter coated with flour, cut dough into biscuits. Place on baking sheet coated with cooking spray, leaving at least 1-inch between each biscuit. Bake for 10 minutes, or until golden brown.
There is not a student that leaves here that I don’t try to impart the technique and love of making biscuits. This picture is of this rosemary biscuit with our homemade fig jam and peppered bacon – it was eaten shortly after the picture was made! Try this recipe with or without the rosemary and see what you think – I’m sure it will quickly become a signature dish for you as well!
Tomato Soup

This week I have a simple but absolutely delicious recipe that is months in the making if you do it right. It all begins in February with the planting of heirloom tomatoes known for their flavor. In a good weather year these tiny seeds become large enough to be planted in my garden in May. It will be July before the first fruits will begin to ripen and are not harvested until they have reached their peak of sweetness.
The harvest is just the beginning. I can remember as a child my Mamaw spending many hours canning tomatoes. Her recipe was simple. Using a hot water bath dip ripe tomatoes for 10 seconds in boiling water to remove tomato skins. Place whole peeled tomatoes in a quart jar till full with 1/4 inch headspace at top of jar. In each jar add a tablespoon of salt, pepper, sugar and vinegar. Apply lids and process in a hot water bath to seal. Now these tomatoes can be used in a variety of recipes but my favorite is a simple tomato soup.
Open one quart jar and put in blender and blend till smooth. Add in 1/4 tablespoon of your favorite Italian spices and heat till warm. Serve up in bowl, stir in a few tablespoons of heavy cream, top with parmesan cheese and bacon or fresh basil. I know this sounds too simple but I promise just one bite and you will be planting seeds in February just like me!
APPLE & FIG SALAD
The dog days of summer are here and for most that means dealing with oppressive heat and little to look forward to outdoors. However for the NTCC Work Scholarship students and I it also means that it is fig harvesting time. For the past four years we have been blessed to harvest from a historically large Celeste Fig tree at Charlie Jack Smith’s home in Mt Pleasant. It engulfs his yard and home and pleases all that are lucky to harvest there.
This year and every year we had a bumper crop and worked quickly to fill our trays and froze them. Why are we so excited to get these figs each year? The one of a kind - Fig Salad that proves to be a much sought after treat at our banquet year after year.
I know most of you may have only enjoyed figs in Newton form. Really they are an old fashioned favorite, easy to grow and very versatile to use in recipes. Their disadvantage is that while wonderfully sweet when picked perfectly ripe - they have absolutely zero shelf life.
So harvest quickly, if not eaten immediately then freeze whole on a cookie sheet single layer only and then store in bags in your freezer for later.
Farm Fashioned Fig Salad: 1/2 sliced apples (I leave the peel on), 1/2 halved frozen figs (depends on how many figs you can harvest on how large this salad is. Next add in 1/4 cup pecans (I like roasted ones best), 1/4 red onion sliced thin or diced if you like, 1 tsp salt and pepper and toss. Dressing is equal parts honey and balsamic vinegar; mix well and drizzle over salad and toss again. On mine - I love to add another flavor layer and sprinkle some feta cheese over the top and some fresh diced mint - but I usually don’t make it too much of a circus of flavors for larger crowds. Serve immediately and enjoy the rave reviews!
Brine Chicken Breasts 101
By Rene’ McCracken
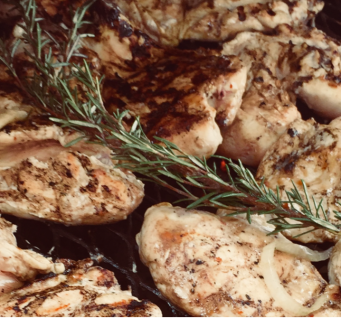
One of my most asked for recipes is my smoked chicken breasts and even I must admit that I can find few places or people to beat it. The trick is in the simple brine to bring just the right texture, flavor and let’s face it look to your poultry dishes. A brine is a sugar and salt mixture with water that the meat is soaked in for up to 24 hours. This allows for the solution to totally saturate the meat and prevent the dreaded dried out chicken as it is smoked or grilled.
In this recipe as with all my creations - I work with what I have. When you live in this area - access to fresh whole skinless chicken breast is a great value. I start with them and clean them and put into a plastic tub. Next I prepare my brine. Simple brine: 1 gallon water, 1 cup kosher salt, 1/2 cup raw sugar, 2 sticks butter or 1/2 cup olive oil. I place all ingredients in a large pot and bring to a boil. While wanting on brine to boil I add in spices and herbs: rosemary sprigs, onion roughly chopped, garlic 1/3 cup minced, black pepper, 1/2 cup lemon juice or balsamic or apple cider vinegar, and 1 large bottle of liquid smoke. Once brine has boiled remove from heat and add ice to cool. Pour brine over chicken and put in fridge for 5 to 24 hours. After brine complete pour off brine and rinse and dry chicken. Now you are ready to smoke or roast the chicken till 175 degree internal temperature. I have a special sauce that I will share later that really goes well with this dish. Completely versatile you can serve whole as main entree or diced in chicken salad or even fajitas.

Today I want to share with you a favorite of mine with my own twist. Deviled egg salad sandwiches. First - only the freshest ingredients will do. Start with free range eggs or the color and flavor will be off. Scramble a doz eggs in a pan with non stick spray or 3 Tbs of real butter. Add in salt and pepper to taste and cook till eggs are set but not dry. Put in a bowl and cover it and put in the fridge. I know most egg salads are from boiled eggs but this was how my Mamaw did it and I prefer her way.
Once the scrambled eggs have cooled add in the following: miracle whip or mayo (depending on your preference) 1/4 cup, sweet pickled relish, 1/4 tsp paprika, 1 tsp dill weed. Mix well and refrigerate at least and hour before building your sandwiches. Choose your favorite bread or toast and load them up. I also add fresh sliced tomato or my muscadine chutney (I will share chutney recipe later). This recipe never disappoints and always gets rave reviews! So give it a try.